


A complete walkthrough from shut-off valves to final caulk - including the prep steps and pro tips that prevent the most expensive DIY mistakes.
Installing a bathroom vanity is one of the most rewarding DIY projects in a home renovation - it's visible every day, it adds immediate value, and with the right preparation it's genuinely manageable without calling a contractor. A standard vanity swap typically takes 4-8 hours, requires no specialty trade skills, and saves $665-$3,300 in professional labor costs.
The difference between a successful install and an expensive do-over is almost always in the prep: measuring before ordering, shimming before anchoring, and testing for leaks before caulking. This guide walks through every step in the correct order - including the steps most tutorials skip - so your installation goes right the first time.
This guide covers a standard vanity replacement in an existing bathroom where the plumbing rough-in stays in the same location. If your project involves moving drain or supply lines, adding a second sink to a single-sink plumbing setup, or installing a floating vanity into a wall without existing blocking, budget for a licensed plumber and/or contractor for those specific phases. The rest - removal, positioning, leveling, anchoring, and finish work - is solidly within DIY territory.
Gather everything on this list before beginning. Running to the hardware store mid-installation - with water shut off and your bathroom out of commission - is one of the most avoidable project delays. A 30-minute pre-install run is worth it.
- Adjustable wrench (10-12")
- Tongue-and-groove pliers (Channel-locks)
- Cordless drill + driver bits (Phillips & flat)
- Hole saw attachment (for plumbing cutouts)
- 4-foot level (or 2-foot minimum)
- Tape measure
- Stud finder
- Utility knife
- Pry bar or putty knife
- Bucket and rags
- Safety glasses
- Pencil / marking pen
- New vanity (with or without top)
- Countertop (if separate from cabinet)
- Sink and faucet (if not included)
- New water supply lines (braided stainless)
- P-trap assembly (check compatibility)
- Plumber's putty or silicone (per drain instructions)
- Teflon / plumber's tape (for threaded joints)
- Silicone caulk (mold-resistant, bathroom-rated)
- Shims (composite plastic preferred over wood)
- 3" drywall screws for stud anchoring
- Wall anchors (if studs not in ideal position)
- Painter's tape (for protecting floor/tile)
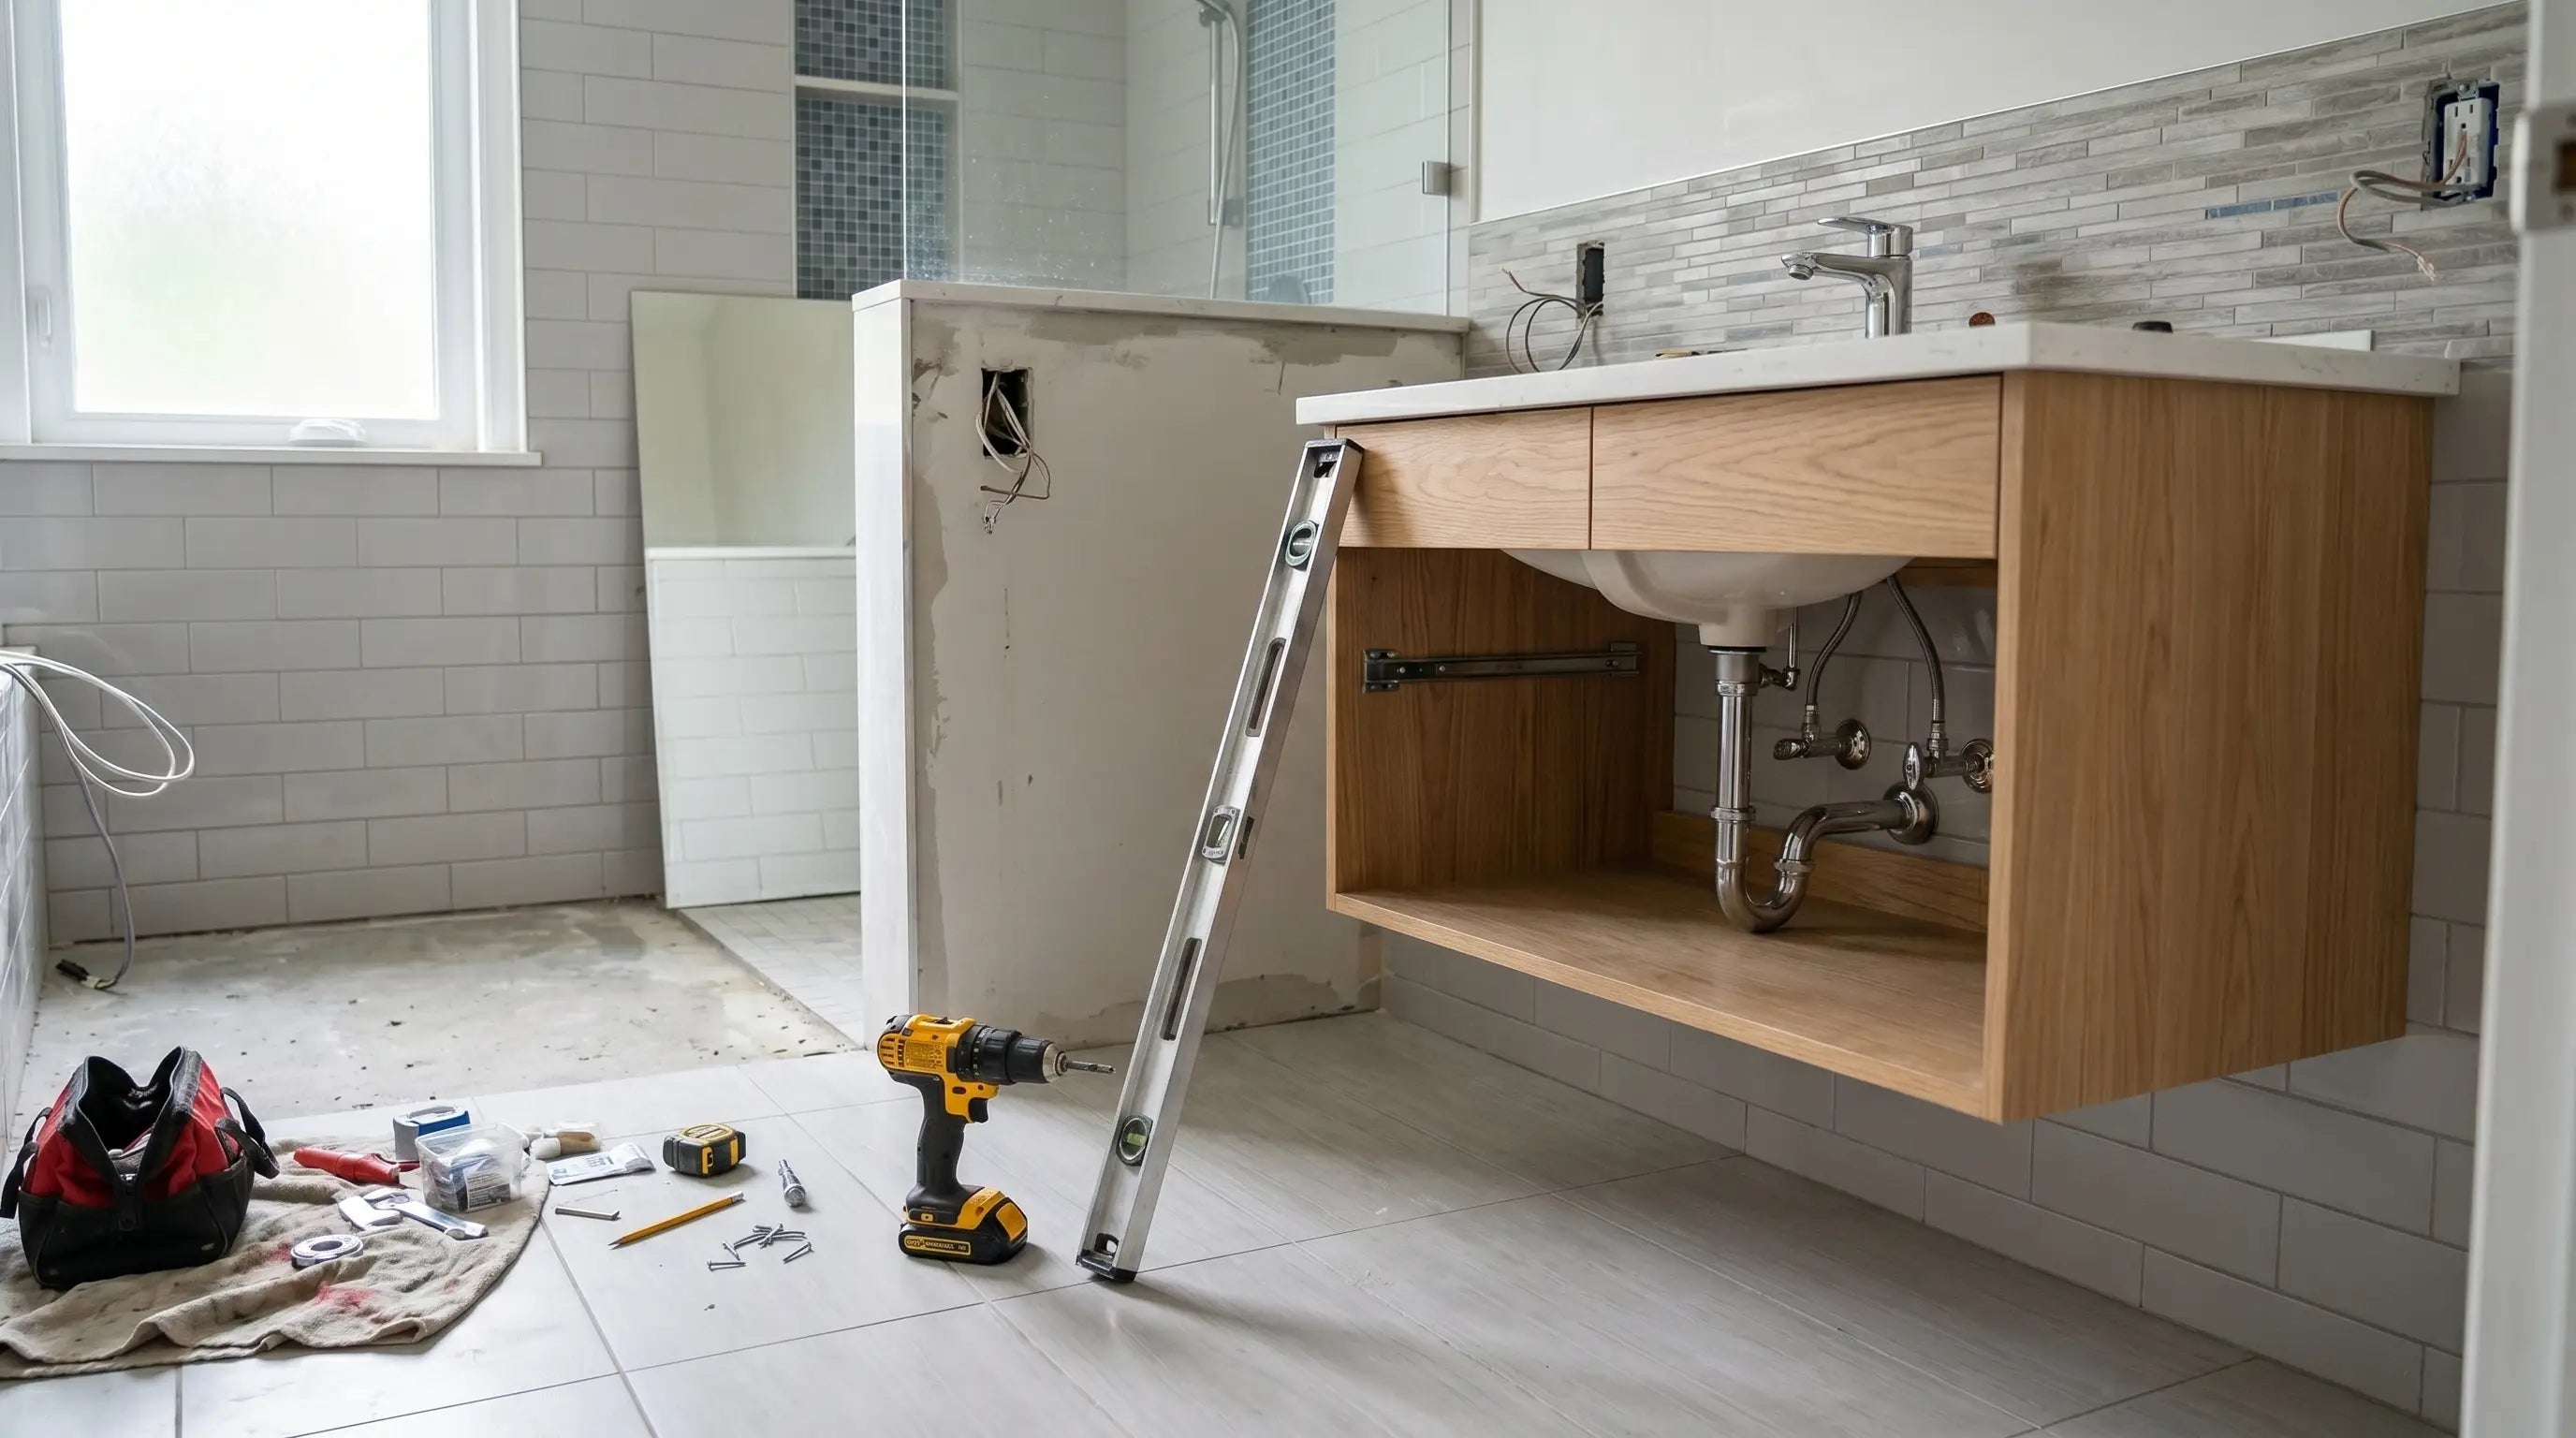
Install the faucet, drain assembly, and any hardware on the countertop or sink before setting the vanity in place. Working inside a fully-installed cabinet under the sink is awkward and slow. Doing it on a workbench or the floor first - before the counter is installed - typically cuts faucet installation time in half and gives you much better access to tighten supply line nuts and drain fittings properly.
Follow these steps in order. Each one sets up the next. Skipping ahead - particularly around leveling, stud location, and leak testing before caulking - is where most DIY installations go wrong.
Locate the hot and cold shut-off valves under the sink - they're the oval-handled valves on the supply lines coming out of the wall or floor. Turn both clockwise until they stop completely. Open the faucet to release any remaining pressure and verify the water is off; the flow should stop within a few seconds.
Place a bucket under the P-trap to catch residual water. Lay painter's tape along the floor and any adjacent tile you want to protect from tool scratches or dropped screws. Remove items from inside the vanity cabinet, the countertop, and the surrounding area to give yourself a clear workspace.
- Both hot and cold shut-off valves turned fully clockwise
- Faucet opened to release pressure - flow stopped confirmed
- Bucket positioned under P-trap drain
- Floor and tile protected with painter's tape or drop cloth
- Vanity and countertop area cleared

Loosen the slip nuts on the P-trap by hand or with pliers - they're the large nuts where the drain pipe connects to the curved P-shaped section. Slide the P-trap off and let the water drain into the bucket. Next, use an adjustable wrench to disconnect both water supply lines from the shut-off valves. Have a rag ready - residual water will drip from the lines.
Run a utility knife along any caulk lines where the countertop or vanity back meets the wall. Work slowly to avoid gouging the wall or tile. Once the caulk seal is broken, look for screws securing the vanity cabinet to the wall studs - typically 2-4 screws through a mounting rail at the back of the cabinet. Remove them with a drill or screwdriver.
If the countertop is separate from the cabinet, have a helper assist as you lift it off - stone and engineered stone tops are 50-100+ pounds and awkward to manage alone. Slide the cabinet out of its position. Scrape any remaining caulk or adhesive from the wall and floor with a putty knife. Now is the right time to patch any drywall damage, paint the wall, or address any tile work before the new vanity goes in - it's nearly impossible to do cleanly once the cabinet is in position.
- P-trap disconnected; water drained into bucket
- Both supply lines disconnected from shut-off valves
- Caulk scored with utility knife along all vanity-to-wall joints
- Wall mounting screws located and removed
- Old vanity and countertop removed from bathroom
- Residual caulk and adhesive scraped from wall and floor
- Wall patched / painted if needed before new install begins
Before sliding the new cabinet into position for the first time, do the prep work that's much harder to do once it's in place. Remove the cabinet doors and any drawers to reduce weight and improve access. Mark the stud locations on the wall using your stud finder - use a pencil so the marks are visible once the vanity is pushed back against the wall.
Hold the new vanity in its approximate position and mark on the back panel where the plumbing supply lines and drain stub-out will exit the cabinet. Remove the vanity, then use a hole saw or jigsaw to cut the plumbing access holes slightly oversized (1-2 inches larger than the pipe diameter) to allow for any alignment adjustments during final positioning.
- Cabinet doors and drawers removed for lighter, easier handling
- Stud locations marked on the wall with pencil at the correct height
- Plumbing positions marked on the back panel of the cabinet
- Plumbing access holes cut - slightly oversized for adjustment clearance
- Faucet pre-installed on countertop (if separate) before cabinet placement

Slide the cabinet into its final position. Check level in both directions - side-to-side along the front face and front-to-back from front edge to wall. Most bathroom floors are not perfectly level, which is exactly why shims exist. Slide composite plastic shims (preferred over wood shims, which compress over time) under the base as needed until the level reads true in both directions.
Once level is confirmed, drive 3-inch drywall screws through the cabinet's mounting rail or back panel directly into the wall studs you marked in Step 3. Use at least two screws per stud location - one near the top of the mounting area and one lower down. Tighten firmly but do not over-torque into MDF or particleboard mounting rails, which can crack. Score off excess shim material with a utility knife flush to the cabinet base.
Never skip leveling. An unlevel vanity causes drawer slides to bind, cabinet doors to swing open or closed on their own, and water to pool unevenly at the sink basin. These problems don't go away over time - they get worse as the cabinet settles. Take 10 extra minutes to get this right. Composite shims (available at any hardware store for $5-$8) compress far less than wood over years of use.
- Cabinet positioned - supply lines and drain outlet pass through holes cleanly
- Level confirmed side-to-side AND front-to-back
- Composite shims installed under base until level reads true
- Minimum 2 screws per stud driven through mounting rail into studs
- Excess shims scored off flush to cabinet base
- Cabinet does not rock or shift when pressed at corners
If the countertop is separate from the cabinet, dry-fit it first without any adhesive to confirm alignment and overhang. The countertop should overhang the cabinet face by approximately 1 inch on the front and sides. Check that the top sits flat without rocking at any corner - if it rocks, identify the high point and address it before applying any adhesive.
Once fit is confirmed, apply a continuous bead of silicone caulk along the top edge of the cabinet (per the vanity manufacturer's instructions - some specify construction adhesive instead of or alongside silicone). Carefully lower the countertop into position with a helper and press firmly. Wipe any squeeze-out immediately with a damp cloth.
For the sink: if using plumber's putty around the drain flange, roll a rope of putty and press it around the underside of the drain flange lip before inserting it into the drain hole. If the sink manufacturer specifies silicone instead of putty (common with granite composite sinks), follow their instructions - putty can stain some sink materials. Thread the drain locknut onto the drain from underneath and tighten by hand until snug. Do not use a wrench on plastic drain bodies - hand-tight plus a quarter-turn is sufficient.
Let the countertop adhesive or silicone cure for the manufacturer's specified time before applying weight or connecting plumbing. For most bathroom-rated silicones this is 24 hours for a full cure, though light handling is typically fine after 4-6 hours. Rushing this step and applying plumbing torque forces to an uncured adhesive joint is a common cause of countertop movement and failed seals discovered months after installation.
- Countertop dry-fitted and confirmed level, no rocking
- Silicone or adhesive applied per vanity manufacturer instructions
- Countertop set with helper; aligned and pressed firmly
- Squeeze-out wiped immediately with damp cloth
- Drain flange installed with plumber's putty or silicone per sink spec
- Drain locknut threaded and hand-tightened from underneath
- Adhesive allowed to cure before plumbing connections made

Connect the hot and cold flexible supply lines (braided stainless is the recommended upgrade from plastic) from the faucet tailpieces down to the shut-off valves. Thread them by hand first until they're seated, then use an adjustable wrench for one additional quarter-turn only. Wrap the threads of any threaded metal joints with two layers of Teflon tape before connecting - this creates a watertight seal on male threads and prevents future leaks at the connection point.
Assemble the P-trap: the curved P section connects the drain tailpiece (the vertical pipe from the sink drain) to the drain stub-out in the wall. The slip nuts should thread on by hand until snug - finger-tight plus a quarter-turn with pliers is correct. Overtightening plastic P-trap nuts cracks them and creates slow leaks that can go undetected for weeks before causing water damage.
- Hot supply line connected to left shut-off valve; cold to right
- Teflon tape applied to all threaded metal-to-metal connections
- Supply lines hand-tightened then snugged one quarter-turn with wrench
- P-trap assembled - drain tailpiece to P-trap to wall stub-out
- P-trap arm slopes downward toward wall at correct pitch
- All slip nuts finger-tight plus one quarter-turn - not over-torqued
This is the step most DIYers rush or skip - and it's the one that prevents caulking over a leak that then causes water damage for months before anyone notices. Turn the shut-off valves slowly counterclockwise to open - no more than a quarter-turn every few seconds. Watch all connections as pressure builds. Check the supply line connections at the valves and at the faucet tailpieces. Check all P-trap slip nut connections. Check around the drain flange where it meets the sink basin.
Run the faucet for a full 2 minutes. Watch underneath with a flashlight - look for any dripping, droplets forming on connections, or water collecting on the cabinet floor. Dry paper towel placed under each connection will reveal slow seepage that isn't visible as a drip. Address any leaks before proceeding: supply line connections simply need another quarter-turn; P-trap connections may need to be disassembled and re-taped.
Never caulk before confirming zero leaks. Caulk seals over a weeping supply line or slow P-trap drip creates hidden moisture damage inside the cabinet - the very damage that leads to mold, swollen cabinet floors, and expensive remediation. The 15-minute leak test is the most important quality step in the entire installation.
- Shut-off valves opened slowly - quarter-turn at a time
- All supply line connections checked - no dripping or sweating
- All P-trap connections checked with flashlight and dry paper towel
- Faucet run for minimum 2 minutes while monitoring underneath
- Drain stopper tested - fills and drains without backup
- Zero leaks confirmed before moving to Step 8

With leaks confirmed zero, apply a neat bead of mold-resistant silicone caulk along the backsplash joint where the countertop meets the wall, and along the base where the cabinet meets the floor. Use a caulk gun for consistent bead pressure - cut the nozzle at a 45-degree angle for a clean application. Apply painter's tape on both sides of the joint for razor-clean caulk lines before applying.
Smooth the caulk immediately with a damp finger or a caulk-smoothing tool, pulling in one continuous stroke along the joint. Remove the painter's tape while the caulk is still wet - peel at a 45-degree angle away from the joint. Allow the caulk to cure per the product instructions before the bathroom is used: most bathroom silicones are shower-ready after 24 hours.
Reinstall the cabinet doors and drawers. Adjust hinges and drawer slides using the adjustment screws (most modern European cabinet hinges allow height, depth, and side-to-side adjustment with a single Phillips screwdriver). Reinstall handles or knobs. Add any base trim if a gap between the cabinet and floor is visible. Wipe down the entire installation with a clean damp cloth to remove fingerprints, dust, and any silicone residue. Step back and inspect all joints in the natural light.
- Painter's tape applied on both sides of caulk joints before applying
- Continuous bead of mold-resistant silicone applied at backsplash and base
- Caulk smoothed with damp finger in one stroke
- Painter's tape removed while caulk still wet at 45-degree angle
- Cabinet doors and drawers reinstalled; alignment adjusted
- Handles and knobs installed
- Caulk allowed to cure 24 hours before water exposure
- Final inspection: no gaps, no squeeze-out visible, no rocking
Floating vanity installation follows the same sequence as a freestanding installation - with three important additional requirements that determine whether the installation succeeds or fails over time.
A floating vanity transfers its entire weight - and the weight of everything on or in it, plus daily use forces - into the wall. Standard drywall alone cannot support this load. The wall behind a floating vanity must contain either: existing studs in the precise locations needed by the vanity's mounting bracket, or horizontal 2×6 or 2×8 blocking installed between studs by a carpenter before drywall is patched. Attempting to mount a floating vanity into drywall with toggle bolts only is one of the most common and most expensive DIY errors - the vanity eventually pulls away from the wall, taking drywall with it.
The primary design advantage of a floating vanity is its fully adjustable height. Standard is 32-36 inches from finished floor to countertop surface, but you can set it to any height that works for your household's average user. Mark the bottom of the mounting bracket position on the wall before drilling. Confirm the height is correct by measuring from the floor at multiple points along the wall - floors are rarely perfectly flat, so use the highest floor measurement as your reference point to ensure the vanity clears the floor uniformly.
Floating vanities typically have either an open back with exposed plumbing (which looks intentional in modern design) or a back panel with precisely positioned cutouts. Measure the drain stub-out and supply line positions precisely before drilling back-panel holes - a 1-inch misalignment that's easy to correct on a floor-standing cabinet is much more visible on a floating unit where the lines are exposed.
If the wall behind the planned vanity location has studs in the wrong positions and requires blocking to be added, this is a task for a carpenter or contractor - it involves opening the wall, installing blocking, and patching drywall. The blocking installation itself costs $200-$500 and makes every subsequent installation much more secure. It's the right investment for a feature that costs $800-$4,000 and will be used daily for 10-20 years.
Most standard vanity replacements are solidly within DIY territory. A few specific scenarios genuinely require licensed professional work - both for quality and in some jurisdictions for code compliance.
| Task | DIY or Pro? | Why |
|---|---|---|
| Standard vanity swap (same plumbing location) | DIY | No structural or plumbing changes required; fully covered by this guide |
| Faucet and drain installation | DIY | Mechanical connections only; no soldering or supply line modification |
| Moving drain stub-out location | Pro - plumber | Requires cutting into drain rough-in; permit may be required in some jurisdictions |
| Adding a second sink to a single-sink rough-in | Pro - plumber | Requires adding supply and drain lines; $500-$1,500 plumbing work |
| Installing wall blocking for floating vanity | Pro - carpenter | Requires opening wall, installing blocking, patching drywall |
| Replacing shut-off valves (stuck or corroded) | Either - assess | Confident DIYers can replace standard angle-stop valves; corroded main-line work requires plumber |
| Tile work around new vanity | Either - assess | Manageable DIY with patience and right tools; professional recommended for full-wall or complex patterns |
| Electrical work (GFCI outlet inside cabinet, lighting) | Pro - electrician | Bathroom electrical requires GFCI protection and permit in most jurisdictions; do not DIY |
- All tools and materials gathered (see tools list above)
- New vanity dimensions verified against available wall space and clearances
- Plumbing rough-in location confirmed - no movement required
- Faucet pre-installed on countertop before cabinet placement
- Water supply shut off at both valves - faucet opened to release pressure
- P-trap disconnected and supply lines removed
- Caulk scored; mounting screws removed; old vanity out
- Wall patched and painted if needed before new install
- Stud locations marked on wall
- Plumbing access holes cut in cabinet back panel
- Cabinet positioned, leveled side-to-side and front-to-back with composite shims
- Cabinet anchored with 3" screws into studs - minimum 2 screws per stud
- Countertop dry-fitted; adhesive applied; set with helper and cured
- Drain installed with putty or silicone per sink manufacturer spec
- Supply lines connected with Teflon tape at threaded joints
- P-trap assembled with correct pitch toward wall
- Water turned on slowly - all connections monitored for leaks for 2+ minutes
- Zero leaks confirmed before caulking
- Mold-resistant silicone caulk applied at backsplash and base
- Caulk cured 24 hours before water exposure
- Cabinet doors, drawers, and handles reinstalled and adjusted
- Final inspection completed - no gaps, no visible movement
Ready to find your new vanity?
Browse Bathify's full collection of single and double sink vanities - floating and freestanding - in every size from 18" to 72". Free shipping on orders over $50.


