


A running toilet is wasting 26 to 200 gallons of water every single day - adding $200 to $600 to your annual water bill. In most cases, it takes one $5-$25 part and 20 minutes to fix it yourself. This guide diagnoses every cause and walks you through each repair step by step.
A running toilet announces itself in one of two ways: a constant trickle or hiss audible from outside the bathroom, or the ghost flush - the toilet that spontaneously refills for no apparent reason, typically every 10 to 30 minutes, as if someone briefly flushed it. Both symptoms have the same root cause: water is escaping from the tank into the bowl continuously, triggering the fill valve to run and top the tank back up. The difference is severity and leak path.
In the US, the average household with a running toilet is losing $180 to $400 per year in water costs depending on local rates. In high-cost water markets - San Francisco, Seattle, New York, Denver, Boston, and most of Southern California - that annual waste exceeds $500. The repair almost always costs less than $25 and takes under 30 minutes. Yet the EPA estimates that 10% of US homes have leaks wasting 90 gallons or more per day - most of them running toilets that the homeowner has normalized or hasn't gotten around to fixing.
This guide covers every cause of a running toilet with specific step-by-step fixes, the exact parts you need (including TOTO-specific replacement parts available at Bathify), and the decision framework for knowing when repair makes sense versus when the toilet itself should be replaced.
The meter test: turn off all water-using appliances and fixtures in your home. Check your water meter and note the reading. Wait 15 minutes without using any water. If the meter has moved, you have a leak somewhere. To confirm it's the toilet (not a pipe, faucet, or appliance), close the toilet shutoff valve (the oval valve on the wall behind the toilet base) and repeat the 15-minute test. If the meter stops moving, the toilet is confirmed as the leak source. If it still moves with the shutoff closed, the leak is elsewhere in the system. This guide covers toilet-specific running; pipe and appliance leaks require different diagnosis.
Start with the dye test. If the flapper is leaking, replace it - $10 and 15 minutes. If the water is overflowing into the tube, adjust the float. If neither works, replace the fill valve.
The dye test (drop a dye tablet or a few drops of food coloring into the tank without flushing, wait 10 minutes - if color appears in the bowl, the flapper is leaking) identifies the most common cause in 30 seconds. A leaking flapper accounts for roughly 80% of running toilets and is the simplest repair available in home plumbing. A properly adjusted float resolves most remaining cases. A failed fill valve covers nearly all the rest. Only a cracked flush valve seat or a structural tank problem requires a plumber or toilet replacement.
Read the full diagnosis and step-by-step fixes below - starting with Cause 1 for the fastest path to a working toilet.
Before buying any parts, run these two 60-second tests. They identify the cause with near certainty and tell you exactly what to fix.
Drop a dye tablet (available at any hardware store for under $2) or 8-10 drops of food coloring into the toilet tank. Do not flush. Wait 10-15 minutes. Check the toilet bowl. If you see color in the bowl water, water is passing through the flapper - the flapper is leaking and needs replacement. This is Cause 1. If no color appears in the bowl, the flapper is holding correctly - move to Test 2.
Remove the tank lid and look at the water level. The water should sit approximately 1 inch below the top of the overflow tube - the vertical open tube in the center of the tank. If the water level is at or above the top of the overflow tube, water is spilling into the tube and draining continuously into the bowl. This is Cause 2 (float set too high). If the water level is below the overflow tube but the toilet still runs, the issue is the fill valve (Cause 3) or a chain problem (Cause 4). The diagnosis matrix below consolidates all scenarios:
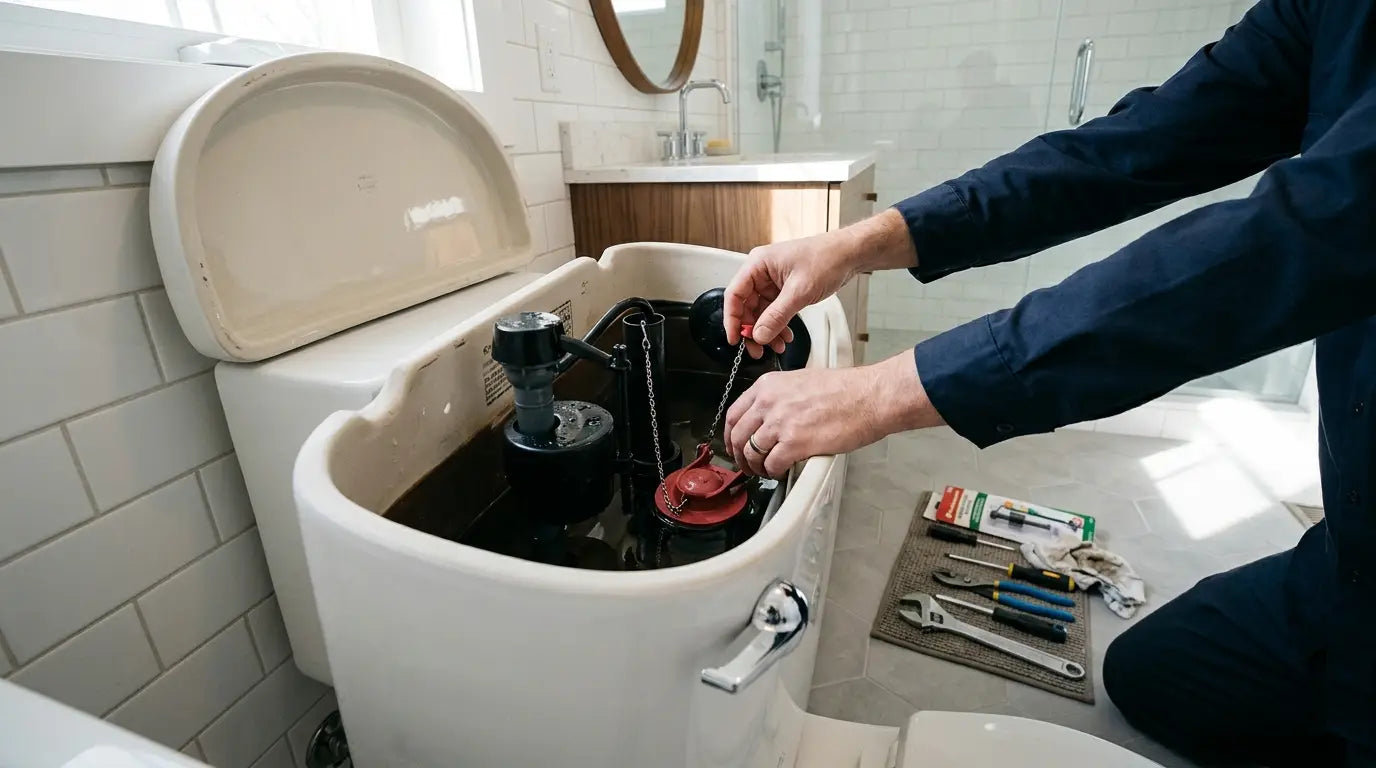
A standard toilet tank contains five key components. Every running toilet repair involves at least one of them:
| Part | What It Does | Fails When... | Repair Cost |
|---|---|---|---|
| Flapper | Rubber seal that covers the flush valve opening at the tank bottom. Opens when flushed; closes to hold water in the tank. | Rubber warps, hardens, or deteriorates after 5-8 years - especially in hard water markets (Phoenix, Las Vegas, Denver). | $5-$15 part · 15 min DIY |
| Fill Valve | Controls water flow into the tank after each flush. Shuts off when the float signals the tank is full. | Internal seal wears out - valve runs continuously, hisses, or fails to shut off fully. Also fails when mineral buildup restricts float movement. | $10-$50 part · 20-30 min DIY |
| Float | Ball or cup attached to or surrounding the fill valve. Rises with the water level and signals the fill valve to shut off at the correct level. | Ball float: cracks and fills with water, sinking too low. Cup float: stuck from mineral scale, can't rise to shutoff position. | Free (adjustment) · or $10-$30 if part of fill valve replacement |
| Overflow Tube | Open vertical tube in center of tank. Drains excess water into the bowl if the tank overfills, preventing the tank from flooding. | Cracks are rare but create a direct path for water to escape continuously into the bowl. | $15-$40 part (part of flush valve assembly) · plumber recommended |
| Flapper Chain | Links the flush handle trip lever to the flapper. Must have 1/2 inch of slack to allow the flapper to seat fully. | Too short (holds flapper open); too long (catches under flapper, preventing full seal). | Free - adjust or reattach chain link |

The flapper is a rubber seal at the bottom of the toilet tank that covers the drain hole (flush valve opening) between the tank and bowl. When you flush, the trip lever lifts the flapper via the chain, water rushes through the opening into the bowl, and the flapper falls back into place to reseal the drain. The tank then refills. If the flapper doesn't form a perfect seal - because the rubber has hardened, warped, or developed a crack - water slowly seeps through the gap continuously, keeping the fill valve running to compensate for the loss.
Rubber flappers degrade over time from water mineral content, chlorine in municipal water supplies, and the cleaning chemicals many households add to the tank. Standard rubber flappers typically last 5-8 years in normal conditions; in hard water markets like Phoenix, Las Vegas, Denver, and Houston, degradation can occur in as few as 3-4 years. The fix is straightforward: remove the old flapper and replace it with a new one matched to your toilet model.
How to replace a flapper - step by step:
- Turn off the water supply. Reach behind or below the toilet to the shutoff valve on the wall - turn it clockwise until fully closed. Flush the toilet to drain the tank.
- Note the old flapper type before removing it. Most US toilets use either a 2-inch flapper (standard gravity flush) or a 3-inch flapper (larger flush valve systems including most TOTO G-Max and some newer gravity-flush models). The size is usually printed on the old flapper or visible in the tank. Take a photo before removing - matching the replacement is critical.
- Remove the old flapper. Unhook the flapper ears from the pegs on either side of the flush valve. Unhook or slide the chain off the trip lever. If the flapper is stuck from mineral deposits, soak in white vinegar for 10 minutes to loosen.
- Inspect the flush valve seat. Run your fingertip around the circular seat where the flapper rests. It should be smooth and free of pits, cracks, or mineral ridges. If you feel roughness or pitting, a new flapper may not fully seal - see Cause 5. If it feels smooth, proceed.
- Install the new flapper. Hook the ears onto the flush valve pegs, reattach the chain to the trip lever with approximately 1/2 inch of slack (enough to allow the flapper to seat fully but not so much that it catches under the flapper).
- Turn the water supply back on. Let the tank refill. Flush several times and confirm the toilet stops running within 60 seconds of the flush completing.
- Rerun the dye test. Drop dye in the tank and wait 10 minutes. If the bowl stays clear, the repair is successful.

The float is the mechanism that tells the fill valve to stop filling the tank. On older toilets, the float is a hollow ball on an arm; on modern toilets including most TOTO models, it's a cup or sleeve float that surrounds the fill valve body and rises with the water level. In either case, if the float is set too high - or if a ball float has cracked and is partially filled with water, making it ride lower than designed - the water level in the tank rises above the top of the overflow tube. Water then drains continuously through the overflow tube into the bowl, and the fill valve runs constantly to replace it.
You can confirm this is the cause by removing the tank lid and watching the water level. If water is visibly spilling over the edge of the overflow tube, the fix is adjusting the float down to a level where the water shuts off approximately 1 inch below the overflow tube top. This is the only running toilet cause that costs absolutely nothing to fix and requires no parts.
How to adjust the float - by float type:
- Ball float (older toilets, pre-2000): Find the brass arm connected to the ball float. Bend the arm gently downward to lower the ball's resting position. Test by flushing and watching where the water shuts off. Target: water level 1 inch below the overflow tube top. Some ball float arms have an adjustment screw - turn counterclockwise to lower the shutoff level.
- Cup/sleeve float (modern toilets including TOTO, Kohler, American Standard): Find the adjustment mechanism on the fill valve body - usually a twist-lock clip or adjustment knob on the fill valve stem. Turn counterclockwise or slide the clip down to lower the float shutoff level. Flush and recheck. The fill valve should shut off with water sitting 1 inch below the overflow tube.
- Cracked ball float: If the ball float feels heavy when you lift it (it has water inside), it needs replacement. Remove the ball by unscrewing it from the arm. Take it to Home Depot or Lowe's and match the thread size for a universal ball float replacement ($3-$8). Or replace the entire ball-float fill valve with a modern cup-float fill valve (Fluidmaster 400A, ~$12) - a simple upgrade that prevents this issue permanently.
Mark the correct water level: After adjusting, use a pencil or permanent marker to mark the correct water level on the inside of the tank (1 inch below the overflow tube top). If the toilet starts running again months later, you can immediately see whether the water level has risen above this mark - confirming a float drift rather than a new flapper failure.

A failed fill valve typically presents as a persistent hissing sound after the tank has filled - the valve can't fully close, allowing a small continuous flow of water into the tank that overflows into the bowl via the overflow tube (even if the water level appears correct). A faulty fill valve may also cause extremely slow tank refill after flushing - 3 minutes or more rather than the normal 60-90 seconds - due to mineral buildup restricting the valve's internal flow channels.
Fill valves in US homes typically last 8-12 years before their internal seals degrade. In hard water markets, scale buildup on the internal diaphragm and float mechanism accelerates failure. For TOTO toilets, the TOTO Adjustable Replacement Fill Valve Assembly ($47.99 at Bathify) is compatible with all current TOTO models and adjustable for height and refill volume. For non-TOTO toilets, the Fluidmaster 400A ($12-$15) or Korky 528 ($10-$14) are universally compatible with virtually all standard two-piece and one-piece US toilets.
How to replace a fill valve - step by step:
- Turn off the water supply. Close the shutoff valve clockwise. Flush to drain the tank. Remove remaining water with a sponge or towel.
- Disconnect the water supply line. Under the toilet tank, unscrew the water supply line from the fill valve shank (hand-tight, or use an adjustable wrench if it's been on for years). Have a towel ready - some water will drain from the line.
- Remove the old fill valve. Inside the tank, grip the fill valve body. From underneath the tank, unscrew the locknut on the fill valve shank (usually hand-tight or requires an adjustable wrench). Lift the fill valve out of the tank from above.
- Set the new fill valve height. Before installing, adjust the height of the new fill valve so the critical water level mark on the valve sits approximately 1 inch below the overflow tube top. On the TOTO replacement fill valve and most Fluidmaster models, this is done by twisting the valve body to extend or retract it before installation.
- Install the new fill valve. Insert the shank through the tank hole, press the rubber gasket firmly against the tank bottom, and hand-tighten the locknut from underneath. Do not overtighten - finger-tight plus a quarter turn is sufficient.
- Reconnect the supply line and refill tube. Reattach the water supply line to the fill valve shank. Connect the refill tube to the overflow tube per the new valve's instructions.
- Turn the water supply on slowly. Let the tank fill and confirm the fill valve shuts off at the correct water level. Flush several times. The toilet should stop running within 60 seconds of each flush completing.

The chain connecting the flush handle trip lever to the flapper must have approximately 1/2 inch of slack when the flapper is seated. Too little slack and the chain holds the flapper slightly open even when the handle is not depressed - water leaks through the gap continuously. Too much slack and the chain can fall under the flapper when it seats, again preventing a full seal. Both problems cause running.
Remove the tank lid and observe the chain position with the flapper seated. If the chain is taut with the handle at rest, reconnect it to a link that provides 1/2 inch of slack. If the chain has excess length coiled near the flapper, shorten it by reconnecting higher on the trip lever. If the chain is kinked, twisted, or has calcium deposits locking it into an unnatural position, straighten it or replace the chain ($3-$5 at any hardware store). Flush several times and confirm the flapper seats cleanly each time.

If you've replaced the flapper with a brand-new correct-fit replacement and the dye test still shows water leaking into the bowl, the problem is not the flapper - it's the flush valve seat, the ceramic or plastic ring that the flapper presses against to form its seal. Mineral deposits (calcium/lime scale in hard water areas), physical damage from a dropped tank lid, or gradual wear can pit or crack the flush valve seat, preventing any flapper from sealing fully regardless of its quality.
To inspect the flush valve seat, drain the tank completely and run a fingertip slowly around the circular sealing surface. Small scratches or pitting can sometimes be smoothed with fine emery cloth (#400 grit) or a flush valve seat repair kit. Significant pitting, cracks, or chips in the ceramic require replacing the entire flush valve assembly - a more involved job that requires draining the tank fully, removing the tank from the bowl, unscrewing the flush valve locknut, and installing a replacement. This is achievable as a DIY project but is significantly more involved than flapper or fill valve replacement, and many homeowners choose to call a plumber for this repair.

Dual-flush toilets (Swiss Madison Sublime II, Concorde, Monaco, Voltaire and similar) do not use a traditional flapper. Instead, they use a tower-style flush valve with a seal at the top of the tower and a canister body that lifts on flush. When this tower seal wears, water leaks through continuously - the symptom is identical to a flapper leak (constant trickle or dye appears in the bowl) but the repair is different. Dual-flush tower seal kits are model-specific, available from the toilet manufacturer, and typically cost $15-$30. Installation involves removing the tank, lifting out the flush valve tower, replacing the rubber seal, and reassembling.
Wall-hung toilets (Swiss Madison Concorde wall-hung, and other carrier-system toilets) have their flush mechanism inside the in-wall carrier - accessible through the actuator plate on the wall without opening the tile. Remove the actuator plate by pulling firmly - it's held by clips, not screws. Behind the plate is the carrier tank access panel, which exposes the fill valve and flush valve. Running on a wall-hung toilet most commonly means the inlet fill valve seat has worn (water runs in past the valve even when closed) or the push-button seal has degraded. Carrier-specific parts (Geberit, Swiss Madison carrier parts) are available from the manufacturer. This repair is DIY-feasible on quality carrier systems with proper access panels - if the actuator plate doesn't reveal accessible components, call a plumber rather than opening the tile.
You can fix 95% of running toilets with parts and tools totaling under $30. Here's exactly what to have on hand before starting:
| Part Needed | Best Universal Option | TOTO-Specific Option | Cost Range | Where to Buy |
|---|---|---|---|---|
| Flapper (2-inch) | Fluidmaster 501B or Korky 100BP | TOTO THU499S (3-inch) or THU331S | $5-$15 | Home Depot, Lowe's, Amazon |
| Fill Valve | Fluidmaster 400A or Korky 528 | TOTO Fill Valve Assembly - $47.99 at Bathify | $12-$50 | Home Depot, Lowe's, Bathify (TOTO) |
| Ball Float | Fluidmaster 5103 universal ball | N/A (most modern TOTO use cup float) | $3-$10 | Home Depot, Lowe's |
| Complete Repair Kit | Fluidmaster 400CRP4 (fill valve + flapper) | TOTO fill valve assembly + TOTO flapper | $15-$65 | Home Depot, Lowe's, Bathify (TOTO fill valve) |
| Dye Test Tablets | Any brand - dye tablets or food coloring | N/A | $1-$3 | Hardware stores, Amazon |
Most running toilet repairs are genuinely DIY-appropriate. Call a licensed plumber when:
| Situation | Why It Needs a Pro | Typical Cost |
|---|---|---|
| Flush valve assembly replacement | Requires removing tank from bowl - risk of cracking porcelain on older toilets | Plumber $150-$350 |
| Shutoff valve won't close | Corroded shutoff valve must be replaced - requires shutting off main water supply | Plumber $100-$250 |
| Running plus floor leak at base | Wax ring failure - requires removing and resetting the toilet | Plumber $150-$400 |
| Wall-hung toilet with inaccessible carrier | Tile must be opened - specialist work, risk of tile damage | Plumber $300-$800+ |
| Flapper + fill valve replaced, still runs | Flush valve seat damage - requires full flush valve replacement or toilet replacement decision | Plumber or replace toilet |
| Flapper, fill valve, float - all DIY | Standard repairs - achievable without plumbing experience | DIY $5-$50 parts |
| Cause | Symptom | Test to Confirm | Fix | Parts Cost | DIY? |
|---|---|---|---|---|---|
| Worn flapper | Dye in bowl; ghost flush every 10-30 min | Dye tablet test | Replace flapper | $5-$15 | Yes - 15 min |
| Float too high | Water at/above overflow tube; constant fill | Observe tank water level | Adjust or replace float | $0-$10 | Yes - 5 min |
| Failed fill valve | Hissing after tank fills; slow refill | Listen for hiss after full fill | Replace fill valve | $12-$50 | Yes - 25 min |
| Chain too short / tangled | Toilet runs; flapper visibly ajar | Open tank, observe chain slack | Adjust chain slack to ½ inch | $0 | Yes - 2 min |
| Cracked flush valve seat | New flapper still leaks (dye test positive) | Finger test seat surface | Seat repair kit or flush valve replacement | $20-$60 | Either - 45+ min |
| Cracked ball float | Water runs; ball float feels heavy | Lift ball float - feels heavy with water | Replace ball float | $3-$10 | Yes - 10 min |
| Corroded shutoff valve | Can't close supply; water flows even with valve "off" | Try to close shutoff valve | Replace shutoff valve | $15-$40 + labor | Plumber recommended |
Fix it today with the dye test + flapper replacement. If that doesn't work, replace the fill valve. If neither works, it's time to consider a new toilet.
A running toilet is a $5-$25 repair that most homeowners can complete in under 30 minutes using parts from Home Depot, Lowe's, or Bathify. Start with the dye test - if dye appears in the bowl, buy a flapper matched to your toilet model and replace it. If the water level is above the overflow tube, adjust the float down for free. If you still hear hissing after the tank fills, the fill valve needs replacement - the TOTO Adjustable Fill Valve Assembly ($47.99 at Bathify) is the correct part for any current TOTO toilet, and the Fluidmaster 400A ($12-$15) works for virtually all other brands.
The decision to repair versus replace comes into focus when: the toilet is over 15 years old, you've replaced the flapper and fill valve and the toilet still runs, you've discovered flush valve seat damage, or when you calculate the total repair cost against the value of upgrading to a modern 1.28 GPF WaterSense toilet. A toilet that's been running for months, has needed two repair cycles in two years, and was made before 2005 is often worth replacing - not just fixing. A new TOTO Drake II or Swiss Madison at Bathify will pay back its cost in water savings versus a pre-2005 1.6 GPF running toilet within 3-5 years.
Browse Bathify's full toilet collection if you decide replacement makes more sense than another repair cycle. Free shipping on all orders over $50 to the continental US.


