


Pot filler faucets look like a luxury. Used correctly, they function like a safety upgrade that pays for itself in the first year. This guide covers exactly who benefits, what installation really costs, the specs that separate good from bad, and the one timing rule that saves you $400 if you're renovating now.
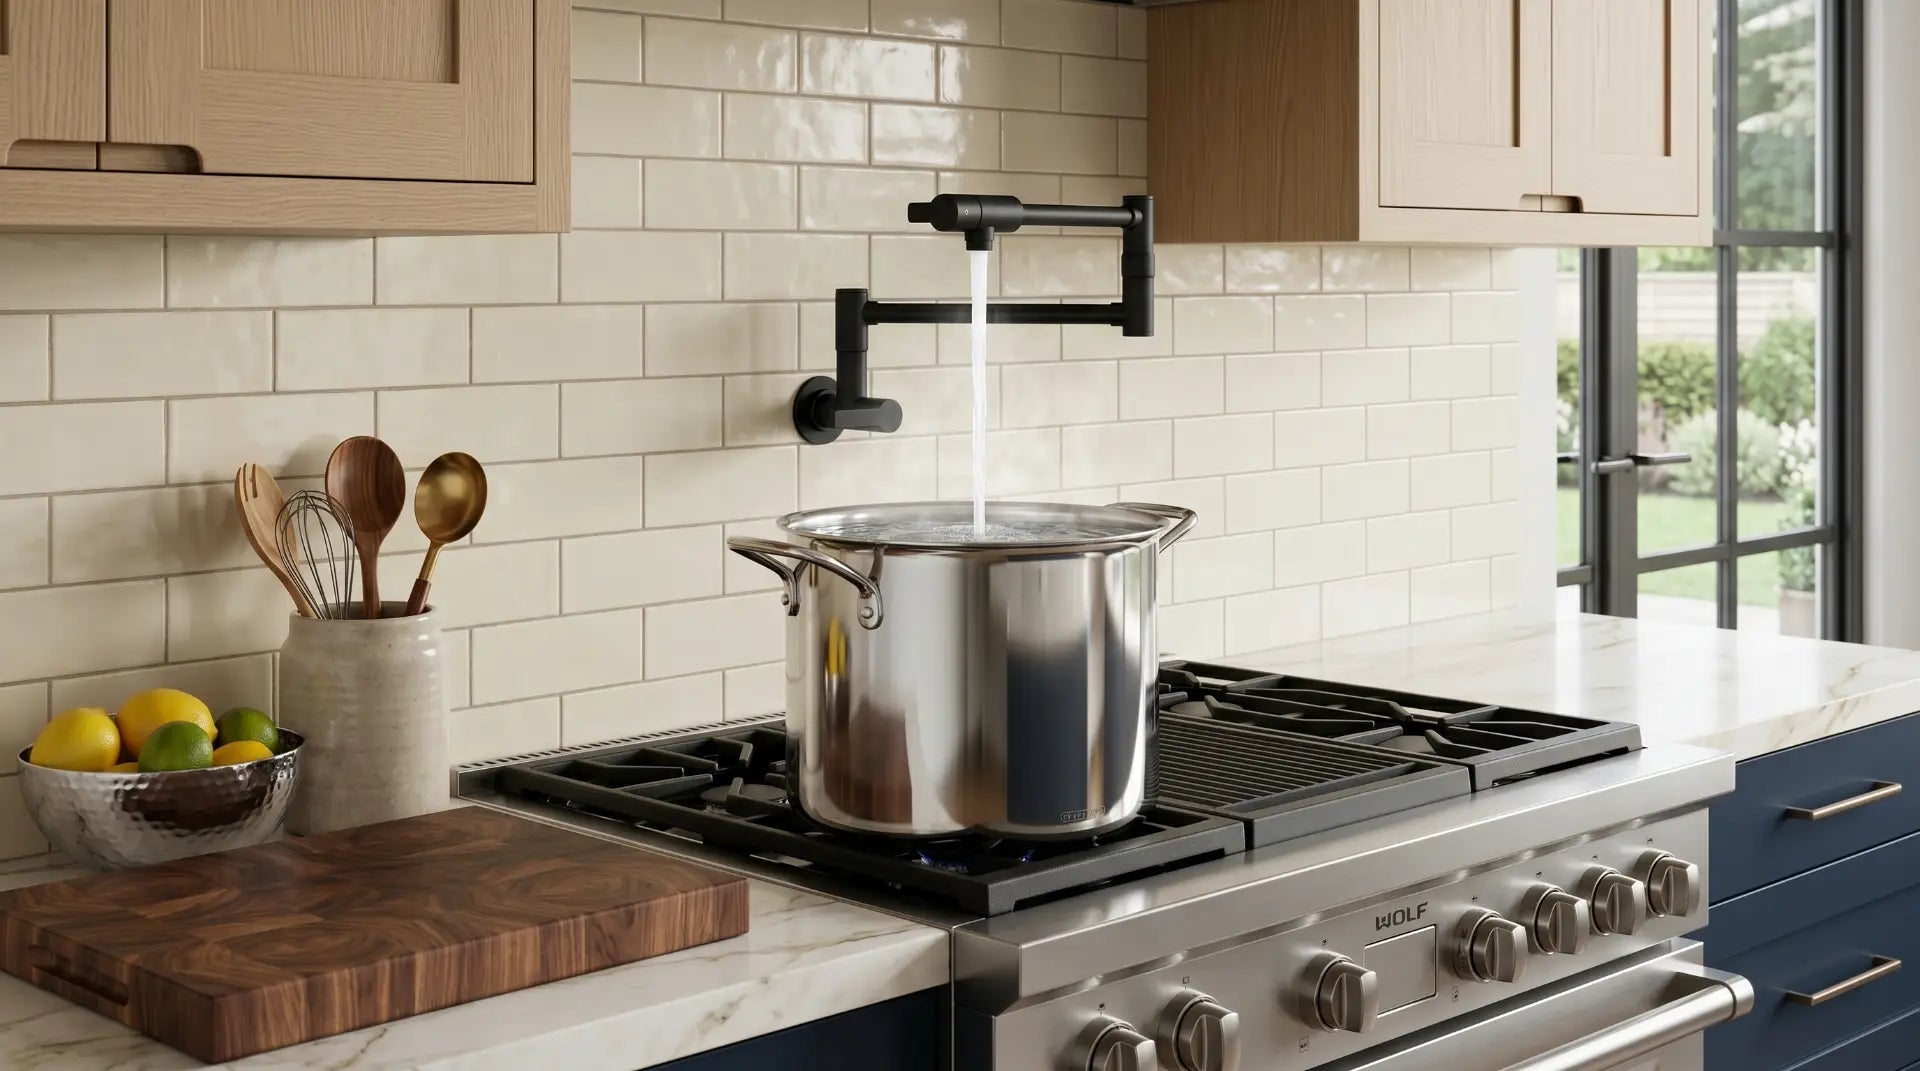
A pot filler faucet is a wall-mounted faucet positioned directly above the range that swings out over a burner to fill a stockpot directly on the stove. You don't carry the pot from the sink. You don't risk spilling eight quarts of water across a kitchen floor. You fill it at the stove, where it needs to be anyway, and the arm folds flat against the wall when you're done. That is the entire product - deceptively simple, and more useful than it sounds on first description.
The "is a pot filler worth it" question is the most searched kitchen faucet query that generates the least honest answers online. Most guides either oversell it as an essential luxury everyone needs or dismiss it as a gimmick. The honest answer is more specific: it is genuinely worth it for certain kitchens and cooking patterns, it is overkill for others, and the installation timing - whether you're renovating now or not - changes the financial calculus completely. This guide gives you the complete picture in the order you need to make the decision.
The most important thing about a pot filler is not the faucet itself - it's whether you're renovating right now. If your kitchen walls are open for a renovation, roughing in a cold-water supply line above the range costs $150 to $300 in incremental plumber labor. If your walls are finished, that same rough-in costs $600 to $1,200. The faucet is $200 to $600 either way. The renovation window closes once the drywall goes up. If you're mid-renovation, skip to the rough-in section before reading anything else.

A pot filler connects to a single cold-water supply line roughed into the wall above the range - typically 18 to 24 inches above the range top surface. From that wall connection extends an articulating arm with one or two pivoting joints that allow the arm to swing from a folded position flat against the wall out over the range burners. At the end of the arm is a spout with a shutoff valve - and on a properly specified dual-valve model, a second shutoff valve is also located at the wall connection point.
The mechanics during use are: swing the arm out over the pot, open the spout valve, fill the pot, close the spout valve, swing the arm back against the wall. The arm stays folded flat when not in use - typically 3 to 4 inches out from the wall - and is held in position by the friction of its pivot joints. The arm swing reaches across whichever burner you position the pot on, typically extending 16 to 22 inches from the wall to cover the main cooking burners on a standard American range.
Pot fillers supply cold water only. This is the most common misconception about the fixture. They connect to the cold supply line because: (a) you are filling a pot that will be heated on the stove - hot water is not a functional advantage; (b) connecting to both hot and cold requires a thermostatic mixing valve and more complex rough-in; (c) in commercial kitchen code environments, cold-only pot fillers avoid cross-connection concerns with the hot water system. In a residential kitchen, cold-only is the standard, correct, and overwhelmingly common configuration.
Yes - for specific kitchens and cooking patterns. No - for others. The answer is not universal, but it is more predictable than most kitchen fixture decisions because the use case is precise. Here is the honest framework:
- You cook pasta, soups, stocks, or boiled grains for your household regularly - at least 2-3 times per week
- Your range is more than 6 feet from your sink - carrying a full pot across the kitchen is a real daily task
- You are currently renovating with open walls - rough-in cost is $150-$300 incremental
- You or household members have limited mobility, lower back issues, or difficulty lifting heavy items
- You do batch cooking or meal prep that involves filling multiple large pots in a session
- Your kitchen design already has a wall above the range - no structural obstacle to wall-mount
- You want a visible high-value design element that signals a fully equipped kitchen
- You rarely cook on the stovetop - household primarily uses oven, microwave, or delivery
- Your sink is adjacent to the range - the pot carry is 3 feet, not a real burden
- Walls are finished with no renovation planned - retrofit cost ($600-$1,200+) exceeds the benefit
- You have an island range without a wall behind it - wall-mount is not possible, deck-mount is complex
- Budget is constrained - the $200-$600 for the faucet plus plumber cost is better spent elsewhere
- Your range hood configuration does not allow wall space above the range
- Household is 1 person, microwave-heavy cooking pattern - pot filler will rarely be used
The most honest case for a pot filler is not convenience - it's safety. The most common serious kitchen injury in American residential kitchens is carrying a full stockpot of boiling or near-boiling water from the stove to the sink for draining, or from the sink to the stove for heating. A 12-quart pot of water weighs approximately 25 lbs. Carried at arm's length across a kitchen floor - often over hard tile or hardwood - a slip or loss of grip has serious consequences. A pot filler eliminates the stove-filling carry entirely. You still drain at the sink. But the heaviest part of the process - lifting a full pot of cold water from the sink across the kitchen to a burner - is gone. For households with young children present in the kitchen during cooking, or anyone with balance or strength limitations, that safety benefit alone justifies the installation cost during a renovation.

The household that cooks dinner most nights of the week - pasta twice a week, soups on Sunday, grain bowls for meal prep - fills large pots on the stove frequently enough that the time and effort savings of a pot filler are noticeable within the first week of use. The fixture pays for itself in convenience within a month and in safety benefit immediately. In cities like Denver, Austin, Nashville, and Phoenix where kitchen renovation activity has been highest in 2024 to 2026, the pot filler has moved from premium-kitchen novelty to near-standard specification in new builds and mid-market renovations specifically because this household type is the dominant buyer profile.

In an open-plan kitchen where the range is on a wall with the island between the range and the sink, the pot-carrying distance can be 8 to 12 feet - a real ergonomic burden with a full pot. In a galley kitchen where the range is directly adjacent to the sink, the pot filler saves perhaps 4 feet of walking. The geometry of your specific kitchen layout should inform how strongly you weight this benefit. Measure the actual distance from your range to your sink. Under 4 feet: pot filler's convenience benefit is modest. Four to 8 feet: moderate benefit. Over 8 feet: significant daily benefit.

For any household member with lower back issues, limited grip strength, arthritis, balance concerns, or any condition that makes carrying a heavy item across a kitchen a genuine safety risk - a pot filler is not a luxury. It is the fixture that removes the most physically demanding and injury-prone task in residential cooking from the daily routine. Occupational therapists and kitchen accessibility consultants consistently recommend pot fillers as one of the highest-value kitchen modifications for aging-in-place planning. The fixture costs $200 to $600. The cost of a fall or injury carrying a full stockpot is an entirely different category of consequence.

A household that batch-cooks on weekends - making large volumes of stock, canning tomatoes, cooking multiple pots of grains simultaneously, or doing a week's worth of meal prep in one session - may fill large pots 4 to 8 times in a single cooking session. Each fill with a pot filler takes 30 seconds. Each fill without one involves carrying the pot to the sink, filling it, and carrying it back - with an interruption to whatever else is happening on the stove. The time savings compound quickly across a 3-hour cooking session. The fixture delivers its clearest daily-use value to this household type.
The plumbing work for a pot filler rough-in involves running a cold-water supply line from an existing supply point - either the kitchen supply loop, the cold line feeding the refrigerator ice maker, or a supply in the adjacent cabinet - up through the wall cavity and terminating at a threaded stub-out at the correct height above the range. The complexity is entirely driven by wall access and the distance from an existing supply point.
In an open-wall renovation, the plumber has direct access to the cavity: they run a branch line, install a shutoff valve, and stub out in 30 to 60 minutes. This is the $150 to $300 incremental scenario. In a finished wall where the cavity is accessible from a cabinet below, they can often snake a supply line up through the cavity without opening the wall - 2 to 4 hours of labor. In a finished wall with a tiled backsplash and no access from below, the tile must be cut, the wall opened, the rough-in completed, and everything patched and refinished - 4 to 8 hours of labor plus tile materials.
Prices in the labor range above are based on US national averages for licensed plumbers in 2026 ($85 to $150 per hour depending on region). In high-cost metros - New York, San Francisco, Seattle, Boston - add 30 to 50% to the labor figures. In lower-cost markets - rural Midwest, smaller Southern cities - subtract 20 to 30%. Always get a written quote from a licensed plumber before purchasing the faucet.
If your kitchen walls are currently open - either because you are in an active renovation or because work has started and the range wall is accessible - rough in a cold-water supply line and stub-out above the range right now, even if you have not yet decided whether you want a pot filler. The incremental cost is $150 to $300 in additional plumber labor. The stub-out gets capped and hidden behind tile or drywall if you decide not to install the faucet immediately. When you later decide you want one - and a significant percentage of households that cook regularly eventually do - you add the faucet for $200 to $500 with no additional wall work. Total cost: $350 to $800 over two visits instead of $1,200 to $2,000 from a finished-wall retrofit.
This is the single highest-ROI decision available in kitchen renovation planning for households where cooking is a real daily activity. The rough-in costs $200. The regret of not doing it when the walls were open, discovered 18 months later when you want the faucet, costs $800 more in wall work. There is no downside to roughing in now. The capped stub-out behind the tile adds no maintenance burden, creates no safety issue, and is invisible once the backsplash is installed. Do it now.

A wall-mount pot filler attaches to a threaded stub-out in the wall above the range - typically behind the backsplash - with the articulating arm projecting outward from that wall connection. This is the standard configuration in the overwhelming majority of US residential kitchens, because most American ranges sit against a wall with a backsplash area above them where the supply line rough-in can be run through the wall cavity without structural complexity.
Wall-mount pot fillers fold completely flat against the wall when not in use, extending only 3 to 4 inches from the surface. They are available in single-joint (one pivot point) and double-joint (two pivot points, greater reach flexibility) arm configurations. Double-joint arms are the correct specification for most kitchens - they allow the arm to be positioned with more precision over specific burners and fold more compactly when stored.

A deck-mount pot filler mounts through a hole in the countertop or range deck rather than through a wall - making it the only pot filler option for island ranges and peninsula configurations where there is no wall behind the cooking surface. The supply line runs through the countertop or cabinet base to a deck-mounted body, with the articulating arm extending upward and over the burners from the countertop surface.
Deck-mount pot fillers are significantly less common than wall-mount models and involve more complex installation - the supply line must be routed through the cabinet base and countertop rather than through an accessible wall cavity. They are also more visually intrusive: the faucet base sits on the counter surface near the range rather than projecting from the wall. For kitchens with island ranges and no wall option, deck-mount is the only viable configuration. For all other kitchens, wall-mount is the correct and simpler specification.
The most important functional specification on any pot filler is the dual-valve shutoff: one valve at the end of the arm at the spout, and a second valve at the wall connection point. The spout valve is the one you operate during every use - swing the arm out, open the spout valve, fill the pot, close the spout valve, swing the arm back. The wall valve provides a secondary shutoff that allows you to isolate the entire pot filler from the supply line for maintenance or in an emergency without shutting off the main kitchen water supply.
A single-valve pot filler has only the wall valve - meaning every fill requires walking back to the wall to turn the water on, and walking back to turn it off. In practice, single-valve pot fillers are used once and then ignored because the valve operation defeats the entire convenience premise. Never purchase a single-valve pot filler. The dual-valve specification is listed in the product specifications as "dual handle," "two-valve," or "spout shutoff included." If the listing only shows a wall valve, it is a single-valve model. Move on.
Pot fillers should be specified with a solid brass body - the same material standard that applies to any kitchen faucet subjected to daily water exposure. Brass resists corrosion from water minerals and cleaning products, maintains dimensional stability over years of use, and accepts the finish coatings (PVD, chrome plating, powder coat) in a way that zinc alloy bodies do not. The arm tubes should also be brass or stainless - not chrome-plated zinc alloy, which shows surface corrosion at pivot joints within 2 to 3 years in humid kitchen environments.
Flow rate for pot fillers is typically higher than kitchen sink faucets - 2.2 GPM is standard, matching the EPA maximum rather than the WaterSense-efficient 1.8 GPM target for sink faucets. The higher flow rate is appropriate for pot filling: a 1.8 GPM flow rate takes approximately 4.5 minutes to fill a 12-quart pot, while 2.2 GPM fills the same pot in about 3.5 minutes. For batch cooking where you're filling multiple pots in sequence, that minute per fill adds up. Most quality pot fillers are at 2.2 GPM - confirm the flow rate is stated in the product spec rather than listed as "high flow" without a number.
- Dual-valve shutoff confirmed - spout valve AND wall valve both present
- Solid brass body stated explicitly - not "metal body" or unspecified
- Flow rate confirmed as 2.2 GPM - stated as a number in specifications
- Arm reach confirmed to cover target burner - measure distance from rough-in stub-out to burner center
- Double-joint arm confirmed for wall-mount - greater positioning flexibility than single-joint
- PVD finish confirmed for matte black or brushed gold - electroplated finish not acceptable for pivot-point areas
- Finish matches primary kitchen faucet and hardware finish - one finish throughout the kitchen
A pot filler is a visible, prominent wall fixture directly above the range - one of the most photographed areas of any kitchen. The finish must match the primary kitchen faucet and the cabinet hardware with the same discipline that applies to every other fixture in the kitchen. A brushed nickel pot filler in a matte black kitchen reads as an oversight, not a design choice. The one-finish rule applies here without exception.
| Finish | Kitchen Style Match | Maintenance | 2026 Trend | PVD Available? |
|---|---|---|---|---|
| Matte Black | Contemporary, minimalist, dark-accent kitchens | Low - hides water spots and fingerprints | #1 in new kitchens | Yes - specify PVD; electroplated fades at pivots |
| Brushed Nickel | Transitional, traditional, most American kitchens | Low - warm tone hides fingerprints | Most widely installed | Yes - standard on most quality models |
| Brushed Gold / Champagne Bronze | Warm contemporary, two-tone kitchens, designer renovations | Medium - shows fingerprints; wipe regularly | Growing 2024-2026 | Yes - confirm PVD; lacquered brass yellows over time |
| Chrome (Polished) | Traditional, all-white kitchens, rental-spec kitchens | High - water spots and fingerprints very visible | Declining in renovations | Standard chrome plating |
| Oil-Rubbed Bronze | Rustic, traditional, old-world farmhouse kitchens | Low - living finish darkens naturally | Niche - traditional kitchens | Typically living finish - will patina over time |
| Stainless Steel | Industrial, professional, all-stainless kitchens | Low - fingerprint-resistant on brushed stainless | Stable - appliance kitchens | Brushed stainless standard |
The PVD finish requirement is more critical on pot fillers than on any other kitchen fixture because the pivot joints are the highest-wear surface on the entire faucet. Every time you swing the arm out and back, the pivot joint rotates slightly under the finish. An electroplated finish - including most matte black and brushed gold finishes sold at entry-level price points - wears through at the pivot point within 18 to 24 months of daily use, exposing the brass substrate and creating a visually obvious degradation exactly at the joint. PVD (Physical Vapor Deposition) bonds the finish at the molecular level and maintains color integrity at the pivot even under repeated rotation. If you are ordering matte black or brushed gold, PVD is not optional - it is the specification that determines whether the finish lasts.
Height above range top: The standard rough-in height for a wall-mount pot filler is 18 to 24 inches above the range cooking surface. This height provides clearance for filling a 12 to 16-quart stockpot - the tallest pot that most residential households use - with the spout positioned above the pot opening. Below 18 inches, the spout may not clear the top of a tall pot when the arm is extended. Above 24 inches, the arm's reach angle may not position the spout directly over the burner without the arm being awkward to extend. Most US ranges have a cooking surface at 36 inches of standard counter height - so rough-in height above the floor is typically 54 to 60 inches.
Horizontal offset from center: The rough-in stub-out should be positioned 3 to 6 inches horizontally to the side of the primary burner center, not directly above it. Centered above the burner, the arm folds flat but the spout hangs directly over the grate - a position that can be damaged by high heat from an active burner below. A 3 to 6-inch lateral offset allows the arm to swing over the burner when in use but fold to the side when not in use, keeping the spout away from direct heat contact.
Range hood clearance: Confirm that the pot filler arm in its extended position does not contact the underside of the range hood. Most range hoods begin at 24 to 30 inches above the range top - well above the 18 to 24-inch rough-in height. However, in kitchens with unusually low hoods or with custom hood configurations that extend further toward the range surface, measure the clearance between the hood bottom and the rough-in height before confirming the stub-out position.
Single-valve pot fillers - where the only shutoff is at the wall rather than at the spout - account for a disproportionate share of returns and negative reviews. The buyer finds an attractive pot filler at a competitive price, installs it, uses it once, and discovers that turning the water on and off requires walking to the wall every time - defeating the entire purpose of the fixture. The dual-valve specification is in the product listing if you know to look for it. Always confirm "dual valve," "two shutoff handles," or "spout valve included" before purchasing. If the listing shows only a wall-mount connection without a second handle at the spout, it is single-valve.
The second most common installation error: the plumber rough-ins the stub-out at a generic "18 inches above the range" without measuring the specific pot height in the household's actual cookware. A 16-quart pasta pot is typically 12 to 13 inches tall. Add 2 inches for clearance and you need the spout to be at least 14 to 15 inches above the range surface. If the rough-in is at 16 inches and the arm has 4 inches of vertical downward arc, the spout may be at 12 inches above the range - insufficient to clear the pot opening with the lid on. Measure your tallest pot before the plumber rough-ins the stub-out. The correct rough-in height is: tallest pot height + 3 to 4 inches minimum clearance + the arm's vertical distance between stub-out and spout end when the arm is fully extended. Most wall-mount pot fillers have a rough-in spec sheet that provides this calculation - consult it before confirming stub-out height.
A pot filler is mounted at eye level on the most visible wall in the kitchen - directly above the range, which is typically a visual focal point in any kitchen layout. A finish mismatch between the pot filler and the primary sink faucet or cabinet hardware is immediately visible from any position in the kitchen. This error is identical to the faucet finish mismatch covered in the Best Kitchen Faucets of 2026 guide - and it is the reason most pot fillers are returned. Confirm the finish against a physical sample of your existing hardware before ordering. Screen color rendering is unreliable for distinguishing matte vs. satin vs. brushed undertones.
Pot fillers supply cold water only. This surprises a significant number of buyers who discover it after installation when they expect warm water and get cold. In residential kitchens, cold-only is the correct and standard specification - you are filling a pot that will be heated on the stove; the temperature of the fill water is irrelevant to the cooking outcome. Some buyers also concern themselves about the time to heat cold water vs. warm water to boiling - the difference is small enough that it should not be a factor in the purchase decision. Confirm this expectation before purchase: a pot filler supplies cold water, only cold water, and will always supply cold water in a standard single-supply rough-in.
This is the single most expensive mistake in the pot filler category, and it happens because the decision to add a pot filler is deferred until after the renovation is complete. "We can always add it later" - and then later arrives, and the tiled backsplash is intact, and the estimate to rough-in through finished tile is $600 to $900 in additional plumber labor, plus tile repair and re-grouting. The incremental cost during an open-wall renovation is $150 to $300. The deferred cost after tile is $800 to $1,200. If you are currently mid-renovation and undecided, rough-in the stub-out now and cap it. You have zero obligation to install the faucet. But you have full flexibility to do so for $200 to $500 anytime in the future without breaking a wall.
| Spec | Entry Level ($100-$200) | Mid-Range ($200-$400) | Premium ($400-$700) |
|---|---|---|---|
| Body material | Zinc alloy - limited corrosion resistance | Solid brass - correct specification | Solid brass - confirmed specification |
| Valve type | Often single-valve - verify before buying | Dual-valve standard on reputable models | Dual-valve always included |
| Arm type | Single-joint - limited positioning | Double-joint - better reach and fold | Double-joint with refined pivot action |
| Flow rate | Often unstated or under 2.0 GPM | 2.2 GPM - correct residential spec | 2.2 GPM - confirmed and consistent |
| Finish type | Electroplated - fades at pivots 12-24 months | PVD available on some models - verify | PVD standard - finish lasts at pivot joints |
| Arm reach | 14-16" - may not reach main burner | 16-20" - adequate for standard ranges | 18-22" - covers all configurations |
| Warranty | 1-2 years - limited coverage | 5-10 years - adequate | Lifetime limited - manufacturer confidence |
| Best for | Not recommended for primary kitchens | Primary kitchens with confirmed specs | Design-forward kitchens, heavy daily use |
Yes - for households that cook regularly. More importantly: yes to the rough-in if you are renovating right now, regardless of whether you've decided on the faucet.
A pot filler faucet is worth it for any household that cooks on the stovetop three or more times per week, has a range more than 6 feet from the sink, or includes a member with any mobility or strength limitation. The safety benefit alone - eliminating the heavy pot carry - justifies the all-in cost of $350 to $700 during an open-wall renovation. It is a daily-use upgrade that reveals its value immediately and maintains it for the life of the kitchen.
It is not worth it as a retrofit through finished tile in a kitchen where stovetop cooking is infrequent. The $1,200 to $2,000 all-in cost for a fixture that fills a pot three times a month does not deliver comparable value to the same money spent elsewhere in the kitchen. The decision is binary: cook frequently on the stovetop, or don't. The fixture exists for households that do.
The specification guidance is simple: dual-valve shutoff, solid brass body, 2.2 GPM, double-joint arm, PVD finish for matte black or brushed gold. These five specs separate a pot filler that performs daily for a decade from one that disappoints within 18 months. Browse the pot filler collection at Bathify for wall-mount models in matte black, brushed nickel, and more - all with free shipping across the continental US.
Shop pot filler faucets at Bathify - free shipping across the USA
Browse wall-mount pot fillers in matte black, brushed nickel, brushed gold, and chrome - all with free shipping on orders over $50 to the continental US.


