







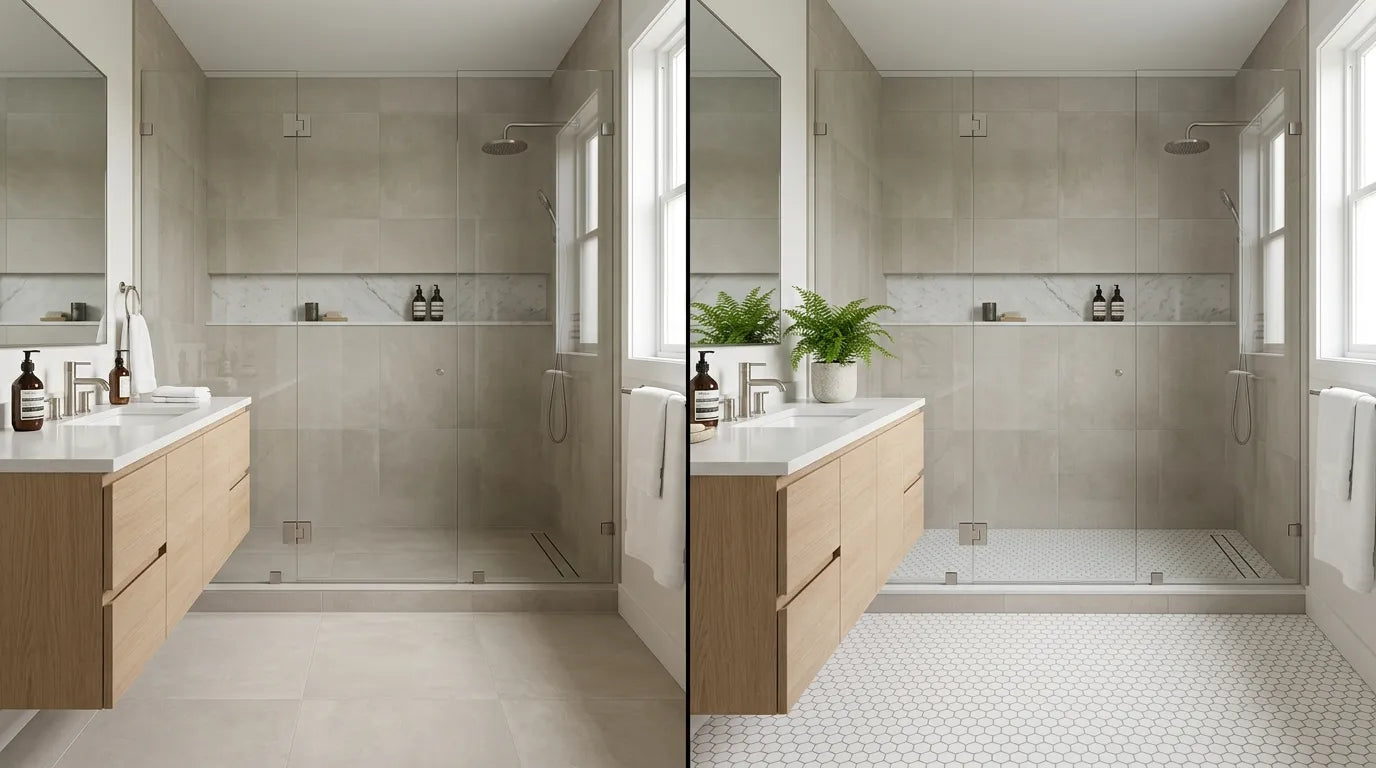
Large Format Tiles vs Small Mosaic
Which tile size actually makes a bathroom look bigger - grout line math, the ⅓ sizing rule, layout direction effects, subfloor specs, lippage, and real installed costs.

The large format tile vs small mosaic debate sounds like a style preference, but it's actually a visual perception question with measurable answers. The size of a tile changes how many grout lines appear across a surface - and grout lines are what the eye uses to estimate distance, scale, and boundary. Fewer lines, fewer reference points, larger-feeling space. More lines, more visual texture, cozier and busier depending on your design intent.
Most online guides on this topic give you the general idea - large tile makes rooms look bigger - without the specifics that actually govern the decision: how many grout lines per square foot at each tile size, the rule of thumb that prevents large tile from looking oversized, what happens to your subfloor flatness requirement when you scale up, and where mosaic tile dramatically outperforms large format regardless of aesthetics. This guide covers all of it with real numbers. Whether you're tiling a 40-square-foot guest bath in Austin or a 120-square-foot master bath in Scottsdale, the same framework applies.
This guide is a supporting post in Bathify's Bathroom Flooring Guide 2026 - the full material comparison covering tile, vinyl, stone, and more. For tile material selection (porcelain vs ceramic), read the porcelain vs ceramic guide first, then return here for sizing decisions.
The tile industry doesn't have one universal definition of "large format" - different manufacturers and standards use slightly different thresholds. Here's the practical breakdown that governs installation requirements and visual behavior in bathrooms.
Any tile where at least one side measures 15 inches or more. Common sizes: 12×24", 18×18", 24×24", 24×48", 36×36". Most US tile standards (ANSI A137.1) trigger different installation requirements at this threshold - specifically stricter subfloor flatness, mandatory back-buttering, and expansion joint requirements. Almost all large format tile produced today is rectified (mechanically cut to precise dimensions), enabling tight grout joints of 1/16" to 1/8".
Any tile where the largest side is 4 inches or less - typically 1×1", 2×2", penny round, 1×2" brick mosaic, hexagon, or 2×4" subway mosaic. These come pre-mounted on 12×12" mesh backing sheets for manageable installation. Standard grout joint width is 1/16" to 1/8". The high grout line density is both a maintenance consideration and a functional advantage on shower floors and wet surfaces requiring slip resistance.
The perception of room size is directly tied to visual reference points. Grout lines are horizontal and vertical lines that the brain uses to measure and segment a surface. A floor with 36 grout-line intersections per square foot is processed by the brain as a grid - which emphasizes the boundaries of the room. A floor with 1 grout-line intersection per square foot is processed as a continuous plane - which de-emphasizes those same boundaries.
This is the measurable reason that large format tile makes bathrooms look bigger: it removes the visual grid, not because the room changed size, but because the brain has fewer reference points with which to measure it. Here's the grout line density at common tile sizes:
Dense grout lines aren't always the enemy of spaciousness. In long, narrow bathrooms where one dimension is dramatically shorter than the other - common in older US homes, especially row houses in Philadelphia, Baltimore, and Chicago - a fine mosaic pattern can add visual width by giving the eye texture to follow across the short dimension. A 60×30 inch powder room with a basket-weave 2×2" mosaic floor reads as an intentional design choice. The same room with a 24×24" tile that has to be cut down substantially creates a pattern with half-tile fragments at every wall edge, which can look worse than the mosaic it replaced. This is where the ⅓ rule becomes essential.
The most useful rule for tile sizing in bathrooms comes from professional tile setters and interior designers who work in residential spaces every day: no tile should exceed one-third of the shortest dimension of the room it's going into. This is the ⅓ rule, and it prevents the most common large-format tile mistake - choosing a tile that looks stunning in the showroom and awkward in the actual room.
The reason for the ⅓ limit is visual proportion. When a tile is close to or larger than ⅓ of the room's shortest wall, two things happen: first, the tile requires heavy cutting at every wall edge, creating irregular partial-tile fragments that read as a planning mistake rather than a design choice. Second, the tile's own pattern or veining becomes the dominant visual element in the room - which works in large luxury bathrooms but overwhelms smaller spaces, reversing the space-expanding effect you were trying to achieve.
Always do a dry layout before setting any tile. Once you know the tile you want, dry-lay a row on the floor starting from the center of the room and working toward each wall. If the cut piece at the wall is less than half a tile width on both ends, shift your starting point by half a tile. The goal is to avoid "slivers" - cuts less than 3 inches wide - at any wall edge. Slivers look wrong regardless of tile size, and they're the most common avoidable tile installation mistake.
Rectangular tile (12×24", 6×24" plank, 3×12" subway) gives you a layout direction choice that square tiles do not. The orientation of the long axis changes how the room feels along each dimension - and this is the most underused design tool in bathroom renovation.
The grout lines run toward the viewer, drawing the eye into the depth of the room. This makes a bathroom feel longer and deeper than it is. Best for: narrow bathrooms that are longer than they are wide (common in older US row houses). Use 12×24" tile with the 24" dimension running toward the door.
The grout lines run across the shorter dimension, drawing the eye side to side. This makes a narrow room feel wider. Best for: rooms where width is the limiting factor - long, thin bathrooms where you want the room to feel less like a corridor.
Tile running floor-to-ceiling in a vertical orientation pulls the eye upward, making the room feel taller. Critical for bathrooms with 8-foot or lower ceilings. Even a standard 3×6" subway tile stacked vertically (not in brick offset) creates a pronounced height illusion. Combine with floor tile running into the room for a small bathroom that feels both taller and longer.
45-degree diagonal floor tile adds movement and visual depth to square rooms, breaking the boxy feel. It genuinely expands the perceived space in a square bathroom layout. The trade-off: diagonal cuts at every wall edge dramatically increase tile waste (15-20% overage vs 10% for straight lay) and installation labor. Only appropriate when the room is nearly square and budget allows for the waste and labor premium.
The right tile size isn't one answer for the entire bathroom - it varies by surface because the performance requirements and visual dynamics are different on each one. Here's the correct framework by surface.

Large format tile is the dominant choice for main bathroom floors in 2026 US design - specifically 12×24" and 24×24" porcelain. The space-expanding effect is strongest on horizontal surfaces because the floor is the first surface the eye comprehends when entering a room. Choose a matte or textured finish to meet the wet COF requirement of 0.60 - polished large format tile on a bathroom floor is a slip hazard. For tile selection details, see the non-slip bathroom floor tile guide. Layout direction matters most here - run the long axis toward the entry for the most dramatic depth effect.

Large format tile is excellent on shower walls and bathroom walls - this is actually where very large tiles (24×48", 36×36") perform best, because the slope and drainage requirements that make large format problematic on shower floors don't apply on vertical surfaces. A 24×48" tile installed vertically on shower walls produces the fewest grout lines, the cleanest look, and the easiest maintenance of any tiled shower surface. Polished or glossy finishes are appropriate on walls - the COF concern that disqualifies them from floor use doesn't apply. This is where large format tile's luxury aesthetic advantage is most dramatic.

The shower floor is the one application where small mosaic tile is the clear winner over large format, regardless of what the rest of the bathroom is doing. There are two reasons: slope conformity and slip resistance. Shower floors require a slope of ¼ inch per foot toward the drain. A small mosaic tile (1×1" or 2×2" on mesh backing) flexes with the slope naturally - the mesh backing accommodates the curve without tile-to-tile tension. A large format tile requires the installer to make a precise cut in every tile piece to follow the slope, which multiplies labor cost and complexity dramatically. The second reason is traction - a 2×2" mosaic floor at ½" grout joints produces approximately 1,200 linear feet of grout per 100 square feet, giving bare wet feet 12 times more grip surface than a 24×24" tile at the same area. See our dedicated non-slip tile guide for the COF data behind this.
The standard approach for high-end US bathroom renovations in 2026: large format porcelain (12×24" or 24×24") on the main bathroom floor and shower walls, and small mosaic (2×2" hexagon or penny round) on the shower floor and inside niches. This combination uses each tile size where it performs best, creates visual coherence by pairing sizes from the same color family, and satisfies the maintenance, safety, and drainage requirements of each surface simultaneously.
| Factor | Large Format (≥15" side) | Small Mosaic (≤4") |
|---|---|---|
| Space perception effect | Strong expansion - fewer grout lines | Cozy / textural - many grout lines |
| Best room sizes | Any bathroom using the ⅓ rule | Accents, niches; all bathroom sizes for shower floor |
| Shower floor suitability | Poor - slope cuts, less grip | Excellent - conforms to slope, more grip |
| Shower wall suitability | Excellent - clean, low maintenance | Fine - but more grout to clean |
| Main bathroom floor | Excellent - space-expanding | Workable - use as accent or mixed |
| Subfloor flatness required | 1/8" over 10 ft (ANSI large format spec) | 3/16" over 10 ft (standard spec) |
| Slip resistance (wet) | Lower - fewer grout lines for grip | Higher - dense grout lines for grip |
| Grout maintenance | Low - minimal grout surface area | High - large grout surface area |
| DIY installation difficulty | High - requires flat substrate, back-buttering, leveling clips | Moderate - sheet backing helps; shower slope is tricky |
| Layout direction control | Strong (rectangular tiles) | Limited (small format) |
| Expansion joint required | Yes - every 20-25 ft; at plane changes | Not typically required |
| Anti-fracture membrane | Recommended over wood subfloor | Advisable but less critical |
| Waste/overage needed | 10-15% (diagonal = 20%) | 10% (sheet format reduces waste) |
| Tile material cost | $3-$15+/sq ft (porcelain mid-range) | $2-$12/sq ft (varies by material) |
| Labor cost premium | +$3-$6/sq ft vs standard tile | Baseline; +$8-$15/sq ft for shower floor |
Every competitor article on this topic discusses grout lines and aesthetics. Almost none discuss the subfloor requirement that changes completely when you go to large format tile - and this is the practical factor that causes the most expensive large-format tile installation failures.
Standard tile installation (tiles under 15 inches) requires the subfloor to be flat within 3/16 inch over a 10-foot span, per ANSI A108 standards. Large format tile (any tile with a side of 15 inches or greater) requires flatness within 1/8 inch over 10 feet - and within 1/16 inch over 2 feet. This is a meaningfully stricter spec. Most US homes with plywood or OSB subfloors over wood joists will not naturally meet the 1/8" requirement without self-leveling compound or grinding of high spots.
Lippage is the height difference between the edges of two adjacent tiles. The industry standard (ANSI A108.02) allows a maximum of 1/32 inch of lippage with no spacer joint, and 1/16 inch where a grout joint of 1/16 inch or wider exists. With large format tiles, lippage is both more likely and more visible than with small tile. The geometric reason: a 24×24" tile bridges 576 square inches of subfloor - any unevenness in the substrate beneath that span produces a corresponding height difference at the tile edge. A 2×2" mosaic tile bridges only 4 square inches, so subfloor variation that creates lippage in large tile is absorbed invisibly across many mosaic tiles and their joints.
Standard tile installation applies mortar to the substrate only. Large format tile installation requires back-buttering - applying a layer of mortar to the back of each tile individually, in addition to the substrate mortar. The reason: large tiles are heavier and cover more area. Without back-buttering, the tile may have voids beneath it where it's not fully bonded to the mortar. Voids cause hollow spots (which you can find by tapping the tile), eventual cracking from unsupported spans, and in wet areas, water infiltration beneath the tile. ANSI A108.5 requires 95% mortar coverage for tiles in wet areas - back-buttering is how you achieve it reliably with large format tiles.
Large format tile requires soft expansion joints - filled with silicone caulk rather than grout - at regular intervals and wherever the tile installation meets a change of plane (floor-to-wall junction, inside shower corners). TCNA (Tile Council of North America) guidelines specify expansion joints every 20 to 25 feet in field areas, and always at perimeter edges where tile meets walls. The reason: large tiles are rigid and have less tolerance for the natural thermal expansion and contraction of the substrate. Without expansion joints, the compressive stress built up over seasonal temperature cycles will crack either the tile or the grout - usually both, usually at corners and perimeter edges. Silicone-caulked perimeter joints are not optional on large format installations; they are a structural requirement.
Anti-fracture membrane over wood subfloors. When installing any tile larger than 15 inches over a wood subfloor, installing an anti-fracture membrane (such as Schluter DITRA or USG Durock) between the subfloor and tile is strongly advisable. Wood subfloors flex - even ones that technically meet the flatness spec. Anti-fracture membranes decouple the tile from the subfloor movement, dramatically reducing the risk of cracked tiles over the life of the installation. The membrane adds $1.50-$3.00 per square foot to material cost but eliminates a primary failure mode of large format tile over wood.
Material cost per square foot is the number most buyers compare - but installed cost is what matters for budgeting a bathroom tile project. Here's the complete picture by tile type and application, using a standard 50-square-foot US bathroom floor as the baseline.
The cost relationship reverses on shower floors. Mosaic installation on a 16-square-foot shower floor costs $8-$15 more per square foot in labor than a large tile shower floor - because the installer places and groutes hundreds of individual mesh-backed sheets and must ensure the slope conforms properly in small-tile increments. For a 16-square-foot shower floor, expect mosaic installation to cost $130-$240 more in labor than a basic large tile floor. This premium is worth paying for the safety and drainage performance reasons outlined above.
Labor rates also vary significantly by market. In Phoenix, Dallas, and Atlanta, professional tile installation labor runs $8-$15 per square foot. In New York City, Boston, and San Francisco, the same work runs $18-$30 per square foot - making the labor component dwarf the material cost difference between tile sizes. If you're in a high-cost labor market, the additional complexity of large format tile installation (back-buttering, leveling clips, substrate prep) has a proportionally larger impact on total project cost than in lower-cost markets.
The strongest bathroom tile designs in 2026 don't use one tile size throughout - they use each size where it performs best and creates deliberate visual contrast. Here's the professional framework for mixing large format and mosaic in a single bathroom without it looking chaotic.
When mixing tile sizes, keep the color palette tight. Large format tile and small mosaic can coexist in the same bathroom if they share a color family - the same white or off-white tone, the same gray range, or at minimum complementary neutrals. The eye forgives a dramatic size difference when the colors relate. It does not forgive unrelated color combinations that happen to be in the same room. A Calacatta white 12×24" floor tile paired with a warm white 2×2" hexagon mosaic shower floor reads as a considered choice. The same 12×24" tile paired with a jet-black penny round mosaic reads as a competition for attention.
The most successful mixed-tile bathrooms use each tile size to define a specific functional zone rather than just creating decorative variety. Large format tile covers the main floor and shower walls - the "background" surfaces. Small mosaic covers the shower floor and niche interiors - the "foreground" functional elements. Grout colors can differ slightly between zones to reinforce the boundary: matched grout in the large format zone, slightly contrasting (never dramatically different) grout in the mosaic zone.
Three mixing patterns that reliably produce poor results in small US bathrooms. First: covering the entire floor in 1×1" mosaic. At scale across 50+ square feet, the visual density of dozens of tiny tile pieces and hundreds of grout lines creates a busy, textured effect that makes the bathroom feel smaller and harder to clean, not more interesting. Use mosaic as accent, not field. Second: mixing three or more tile sizes in a single room without a clear zone logic. Every new size adds a transition point that the eye must process. Two sizes with clear zone boundaries = intentional. Three sizes scattered randomly = chaotic. Third: high-contrast grout throughout. Dark grout with light large format tile amplifies grout lines and partially negates the space-expanding benefit you were buying. Save the grout drama for accent areas.
Large Format for Floors and Walls. Mosaic Where Performance Demands It.
For main bathroom floors: Large format tile - specifically 12×24" porcelain in a matte or textured finish - is the strongest choice for the majority of US bathrooms in 2026. It reduces grout maintenance, creates the space-expanding perception of a continuous floor plane, gives you layout direction control, and is widely available in porcelain at the specs needed for bathroom floor performance (PEI 4+, wet COF ≥ 0.60). Apply the ⅓ rule to confirm your tile is proportional to the room width before ordering.
For shower walls: Large format tile, as large as budget and substrate allow. A 24×48" vertical tile on shower walls is the cleanest, lowest-maintenance, most visually expansive shower configuration available. The subfloor flatness requirements that complicate large format floor installation don't apply on walls, making very large tiles more practical here than anywhere else in the bathroom.
For shower floors: Small mosaic tile - 2×2" hexagon or penny round porcelain, matched in color to the floor and wall tile - is non-negotiable. The slope conformity and slip resistance that mosaic provides on a shower floor aren't achievable with large format tile without significantly higher installation cost and complexity, and neither finish result is as safe or durable. This is the one area where small beats large every time.
The non-negotiable installation prep: Before ordering any large format tile, check your subfloor flatness with a 10-foot straightedge. If it's more than 1/8" out of flat, budget for self-leveling compound or grinding before tile goes down. The tile decision is the easy part - the substrate is where large format success is actually determined.
Complete Your Bathroom at Bathify
Once your tile is chosen, the vanity, mirror, and fixtures define the rest of the space. Bathify carries premium bathroom vanities, mirrors, shower accessories, and more - with free shipping across the USA on orders over $50.


